cost of hair transplant

Space-Saving Sponges for Small Kitchens!

Save storage space in a small kitchen using pop-up sponges!

Hey guys! I just wanted to “pop” in today to share a cool little product that I recently discovered:

Pop-Up Sponges!

Williams-Sonoma Pop-Up Sponges for small kitchens

via

Remember those little washcloths & toys that would “grow” when you put them in water?? This is pretty much the same concept, but for grown-ups! Pop-up sponges are compressed into tiny little units so you can store a TON of extra sponges in a very tight space, and then they expand to full-size when you use them!

If you have limited storage space in your kitchen, then you know that every extra inch can be a big deal. I love having a good stockpile of supplies, but it can be tricky to stay well-stocked without cluttering my cupboards. Here are a couple of the pop-up sponges I’ve found:

The Posh Pop-Up

Small space kitchen supplies: pop-up sponges!

These sponges from Williams-Sonoma have the best ratings for quality, but the price tag is a little bit steep at $16.95 for a pack of six! If you are picky about sponges, these are the best. They expand to a thicker size than others, they’re all natural, and they’ll last through quite a few washes in the dishwasher  before needing a replacement.

Small & Sturdy
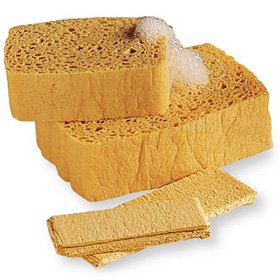
Save storage space in a small kitchen with these pop-up sponges!

If you’re not as picky & don’t feel like shelling out for the Williams-Sonoma version, the pop-up sponges from EZ Brite had some pretty good reviews on Amazon. They’re not as large or thick as their more expensive counterparts (buyer beware – reviewers claimed that the actual product was much thinner than what is depicted in the photo), but they’re still all natural, and the price is more budget-friendly, ringing in at $15.95 for a pack of ten.

I’m not sure that they’d be worth the investment if you have plenty of space in your cupboards, but if you’re cooking in a teeny tiny kitchen, these could be a great way to save space while remaining well-stocked on supplies!

Have you ever tried pop-up sponges? What are your favorite space-saving kitchen products?

Tagged with: , , , , ,
Posted in Organizing

Autumn Organizing Tips

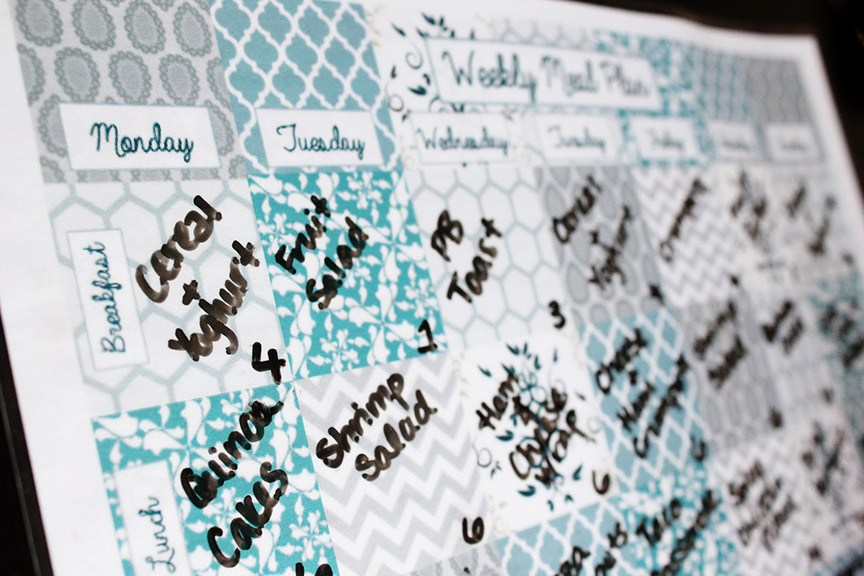
Free Printable Meal Planner

September is in full swing, and as the lazy days of summer take a turn for the hustle & bustle of fall, I’m teaming up with my lovely contributors to share some of our favorite back-to-school & autumn organizing tips!

Make Meal Planning Easier:

I’m a huge fan of easy meals!! We use our slow cooker like crazy for breakfast AND dinner. At night, I’ll throw in some eggs & bell peppers to wake up to a yummy breakfast casserole (I make oatmeal in my slow cooker, too!). Then, I just switch out the liner (hooray for slow cooker liners!) & pop in an easy recipe for dinner. I have tons of ideas shared on my Meal Ideas Pinterest board. No cooking, no dirty pots & pans, and a home-cooked meal always waiting for me — it is definitely a cooking routine I could fall in love with!

Free Printable Meal Planner

  •  One of my favorite parts of summer is the amount of entertaining we end up doing. We tend to have guests from America, and plenty of impromptu evenings hanging out with friends {read: more wine and beer up in here!}. The meal plan kind of gets tossed out of the window. When things calm down, I like to go back to planning our meals for the week. Using my super simple patchwork meal planner, I can easily plan for grocery shopping, and also keep track of my Weight Watchers points for each day. — Beth


  • Using the slow cooker and bread machine make the fall even more cozy and delicious. The house smells amazing to come home to, which triggers some serious nesting for me. This is especially effective on Sundays. I have no idea why. I also stock up on TEA. Lots of tea, different flavors. Herbal or caffeinated, green or fruity. Honey to sweeten it. What would I do without tea? — Annie


Tidy Up:

When you think about it, the changing seasons are a great time to declutter. I’m moving around my clothes, organizing decorations, and putting things into storage. Since I’m already handling everything, it’s really easy to take stock of what I have & get rid of items that are no longer useful or needed! I just set my timer & declutter in whatever area I’m already working.

Garage, how to declutter, how to organize


  • On the side of the house where we have a river view, I clean the windows and take the screens off. That way, I can see the ducks, geese and birds clearly, without fuzziness caused by the screens or dirty windows. Removing the screens makes such a difference that, since I started taking them down, I can’t NOT do it every fall now. — Annie


  • I tend to do a major clutter overhaul a few times a year. Once in early Autumn (after lazy summer days have gone but before winter hibernation sets in), once in January after the holidays, and once in Spring. These are the times that our house tends to need the most attention in terms of clutter control. I also make sure to de-clutter after we complete any major DIY projects around the house! — Beth


  • I switch up all my summer clothes for winter clothes. I keep my summer stuff in the same spot in my closet that I put all my sweaters and hoodies, so it’s pretty much just a matter of doing a switcheroo. I keep the summer clothes bin accessible for about a week before storing it away for good, so if I find more summer items in my closet that I missed, I can just put them in the bin. — Annie


“Fall” Into a Routine:

I would be useless without my morning routine! I use a checklist on my phone & a timer to keep me moving productively while I’m still in zombie mode. 

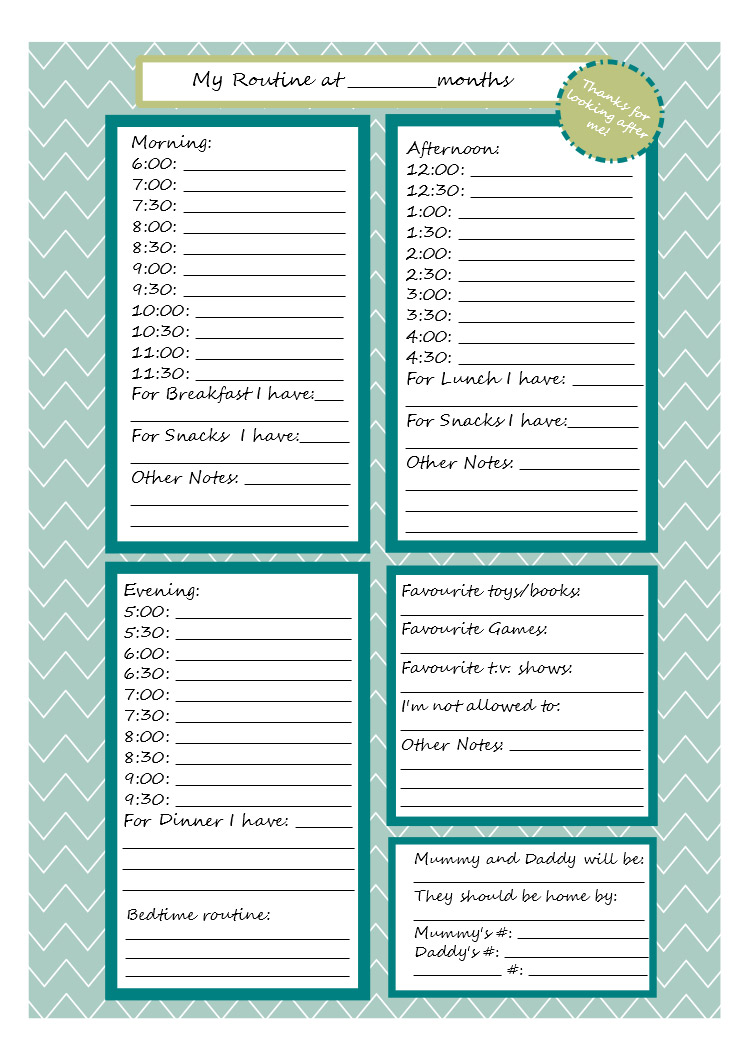
Printable Babysitter Note Sheet

  • We don’t have a kiddo in school yet, but our little guy has a schedule that is constantly changing! When I’m at work, I leave a printed babysitter note sheet on our fridge so that whoever is watching Elijah knows what the current routine is. — Beth


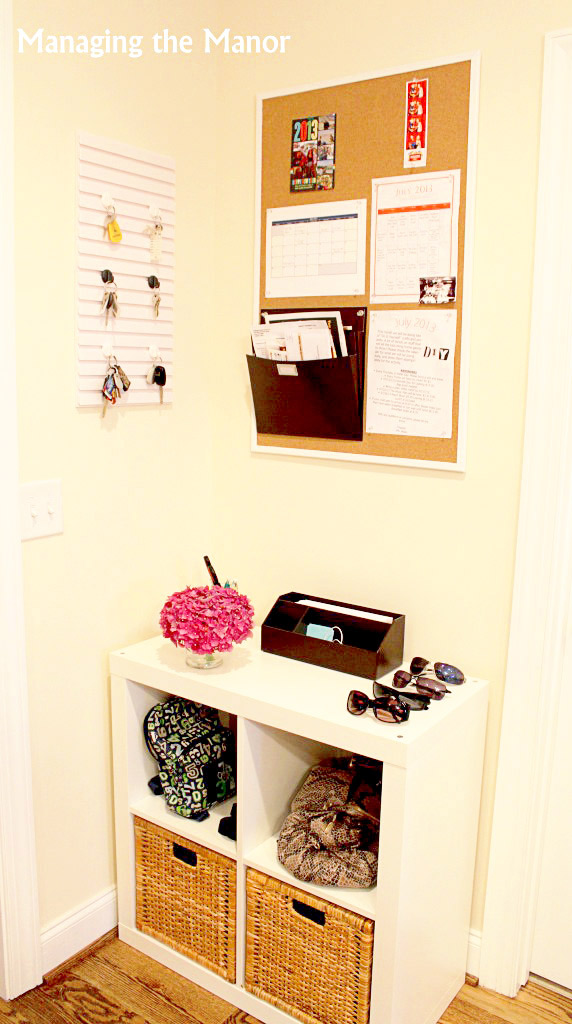
command center hallway organizer -- catch clutter right when it comes in the door!

  • One area that has improved our morning routines is our command center. It is located right outside of our garage door, in our kitchen, which is the epicenter of our home. Our family calendar, school schedules, and meal plan are displayed on the corkboard. Our son’s book bag, my purse, shoes, wallets, keys, sunglasses, phones, etc. are dropped in the center daily and can easily be grabbed the next morning on our way out the door. — Erin


  • Another thing that creates smoother mornings is outfit planning. Every Sunday evening, I create 5 days’ worth of outfits for my son and I (my hubs wears uniforms) and hang them in a small space on each our closet racks. It’s nothing fancy but certainly takes the guesswork (read: crucial time) out of our mornings to already have clothing and accessories ready for wear each day! — Erin

Thanks so much for helping me share ideas, ladies!!

How do you get into the swing of things when autumn rolls around?

Tagged with: , , , , , , , , ,
Posted in Organizing

Cleaning Hacks: How to Cheat at Ironing

Cleaning hack: use a straightening iron to smooth out wrinkled shirts in a flash!

You all know how much I hate ironing, but sometimes, ya just gotta make it happen. Here’s a super quick little cleaning hack that will get your wrinkled shirts looking spiffy in a jiffy!

Cleaning hack: use a straightening iron to smooth out wrinkled shirts in a flash!

Yes, that IS a straightening iron!

how to cheat at ironing: use a flat iron!

How to Cheat at Ironing:

If you just have one shirt that needs a little bit of love, you don’t need to drag out your ironing board & spend twenty minutes making it look perfect. Just grab your little straightening iron & focus on cleaning up the worst parts!

  • Use a little bit of wrinkle spray to get the worst of it if it’s really rough
  • Make sure there isn’t any hair product on the iron
  • Smooth out the most noticeable details (collar, button, etc.)
  • Feel like a genius & conquer the rest of your day!

BONUS: I like to save even more time by using this trick on days when I straighten my hair since the iron is already hot!

How do you “cheat” on your cleaning routines??

Tagged with: , , , ,
Posted in Organizing

DIY Desk Storage: A Chest to Impress

how to organize your office
The lovely Annie from annie hearts is stopping by today with a pretty little DIY organizing project!
how to organize your office
Hi organized people! I’m so happy to be here and showing you my project today.
desk organizer
I found these cute little cardboard boxes at the thrift store and I saw insta-potential for office storage.
Office Organizer
I wasn’t crazy about the two different colors though, and the white one was yellowed a bit, as you can see in the middle drawer above. I also wished they were larger and chestier. More chest-like. You know what I mean. I wanted them to sit on my desk and have a bit of presence, rather than two separate sets of drawers taking up desk real estate, so I stapled one on top of the other.
Office Storage Hack
 
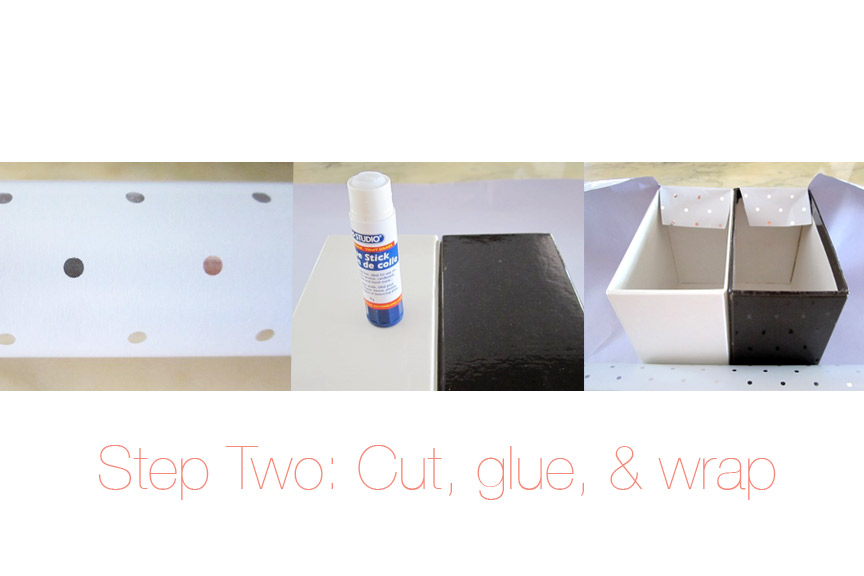
I got out my polka dot wrapping paper (that I got at The Papery, a local store in Ottawa), my X-Acto knife, scissors, and glue stick.
Office-Storage-DIY
Cardboard Desk Organizer
I sort of just went for it with wrapping the little chest. With each individual “drawer” box, I got more of a system going.
DIY Desk Organizer
The little nook where you pull the drawer out required special care.
office organization upcycle
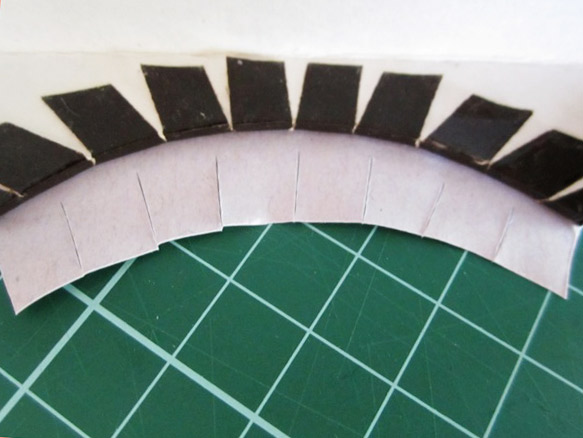
I followed the lead of the manufacturer who made the original and cut little tabs so the edges would fold nicely over.

wrapping tip

Tip: When wrapping around a curve, cut small tab sections & fold over a little piece at a time for a smooth edge.

organizing upcycle
I covered the inside of each box (I was seeing dots no matter where I looked at this point) & put my office supplies in each drawer.
office storage upcycle I put the chest on my desk in my white office. (Yes, that’s a bedazzled stapler and tape dispenser. My husband refuses to use either of them.) diy organizing upcycle, upcycled desk caddy
I love how the polka dots shimmer in the light!

annie hearts

About Annie

annie hearts blog

“Do what you love because how you spend your days becomes how you spend your life.”
I’ve been writing annie hearts in my head for years. Growing up, I was a wanna-be interior designer with grandiose schemes for my parents’ home, much to their dismay. I’ve been doing sewing, painting and refurbishing projects ever since my mom first sat me in front of a sewing machine and my dad taught me to use a paintbrush and a hammer.I got hooked on DIY blogs right around the time I bought the little house on the river. Seeing the before and afters, the transformations on a dime, I thought, I’d love to do that. DIY blogging had my name—and my house—written all over it.
And so it goes that I’m well on my way to spending my days doing what I love.
Tagged with: , , , , ,
Posted in Organizing

How to Make a Room Feel Larger

You may have a rather small living room, bedroom or kitchen in your home. Maybe  you can’t afford to move, but there are ways to make a room feel larger. Most people’s homes have some kind of clutter; clutter can make a room appear smaller than it is.

Clutter

If you want your living room or bedroom to feel larger than they are, then be ruthless about clutter. Get three boxes: one for things to keep, one for throwing away, and the third for charity. Once you have decided what to keep, find homes for it all so that it is not taking up valuable sitting or walking space.

Get as Much as You Can Off the Floor

Most of us tend to have things on the floor, such as book cases or plant holders. Use wall shelves in preference to a space-taking book case. Get plants off the floor and onto shelves or out into the garden or on the balcony.

Double Duty Furniture

Buy furnishings that have more than one use, for example a bed with drawers is extremely useful for storing spare sheets and duvet covers. Get yourself a solid state coffee table where you can lift the top and store things underneath.

Television

A growing number of people now have flat screen televisions. If you are short of space in your living room then have the television mounted on the wall to give you some extra floor space.

Replace Curved Furniture

If you have curved living room cupboards and furniture or curve fronted dressing tables and wardrobes, replace them with straight edged items. Plain, linear objects make a small room appear more spacious.

Get a Smaller Bed

If you have a queen or king sized bed in a small bedroom, swap it for a regular double bed as this will give you a bit more space. Store as much as you can in wall cupboards or shelved alcoves. Make sure that any accessories such as bedside lamps and tables are smaller as this will be in keeping with the size of the bed and provide an illusion of more space.

Child’s Room

The obvious choice for a child’s room that is small is bunk beds. Invest in some boxes on rollers as these are useful for storing shoes and toys. If you only have one child in the room then look for a bed that has storage incorporated, some even have a desk underneath, great for homework.

Ditch the Curtains

Curtains can make a small room appear even smaller. Swap your curtains for blinds because they fit snugly to the windows and this makes the room look bigger. Use accent lighting in a small room it makes it feel larger.

Decoration

A smallish room can feel claustrophobic if the furnishings and décor are dark. Choose light colours and read up on decorating tricks to make a room appear bigger, e.g. painting a chimney breast in a light colour and alcove walls in a slightly darker colour, suggests more room. Lay light coloured carpet or alternatively have plain wooden floors that are sealed with a clear varnish.


About the Author:

Crispin Jones writes for Vibrant Doors – specialists in external and internal bi folding and sliding doors. For more information follow them on twitter.


** This Is A Sponsored Post** Thanks for helping us keep the lights on, Crispin!

I love the tip about going for straight lines instead of curved lines on furniture to save space — so smart!!

Posted in Organizing

Coffee Bar: Style Your Grounds for Less Than A Pound!

coffee bar

I love our super-functional, space-saving coffee station, but when it comes to turning an organizing project into full-on home decor, Beth’s beautifully styled coffee bar really takes the (coffee) cake!!

Well, hey there Pretty Organized friends!  Today I’m stopping by to share some tips for creating your very own coffee bar. We’re going to put the “fun” in function, folks.

In our dining room, we have this amazing open china cabinet/sideboard (I’m not even sure what to call this piece of furniture).  I was always a little stumped when it came to styling it, and what its function should be.

I wanted a way to display our china, but I also wanted the space to function since I knew it would get a lot of use. One evening, it suddenly occurred to me: a coffee bar! It was the perfect solution.

And so, I give you:

Our New Coffee Bar!

DIY styled coffee bar

I host a brunch for ladies from our church once a month, and everyone knows you can’t have brunch without tea or coffee! I wanted our coffee bar to function so that people could easily help themselves and fix their beverages the way that they like. This piece of furniture has a great combination of open storage and drawers, which means it functions fantastically.

The drawer directly below the coffee maker houses sugar, sweetener, spoons, travel mugs (great for other moms with kiddos), a tea towel for quickly mopping up any spills, various types of tea, and hot cocoa: 

On display, there’s a jar of normal tea bags, and an adorable vintage jug that I can fill up with milk, so that people have easy access.
kitchen organizing ideas: make your own pretty coffee station

The open storage is also ideal for displaying our cool coffee grinder/storage jar:

how to organize a coffee bar: a cute idea for decorating your dining room & making guests feel welcome!

Here are a few Amazon links for a similar coffee grinder & similar storage jar (so pretty!)

Last but not least, all the tea cups are right there for people to use.

how to organize: open storage decor ideas -- make your own coffee bar!

Now, if you are detail-oriented, you may have noticed that some of the items in the close-ups are in different places than in the main photo of the coffee bar. That’s because I’ve been having fun figuring out the best way to style the coffee bar! Head on over to The Incomplete Guide to Living to see all the fun ways you could style your very own coffee bar. :)  

Beautifully done, Beth!! I think you should come up with your own name for the mystery  furniture item — maybe the caffeine cupboard?? So pretty!

What I Love:

  • Open storage makes everything accessible
  • She made her functional coffee station into a beautiful display piece, making her decor pull double duty!
  • She was smart & thrifty, repurposing items that she already had & including new pieces that she found at bargain prices (can you believe that her total cost to style this coffee bar was less than a pound??)

About Beth

Elizabeth

I’m Beth and I’m so excited to be contributing here at Pretty Organized! My husband and I live in England in a farm house that dates back to the 13th century, and we are doing our best to make it a 21st century home while maintaining the character of the house.  Over at my blog, The Incomplete Guide to Living, I share all kinds of projects and inspiration from my life as a wife, mom, and decorating/DIY enthusiast!  

Tagged with: , , , , , , , ,
Posted in Organizing

Reader Feature: Small Bathroom Storage Solution

Use shower caddies as shelves to organize awkward sink spaces. Genius!

Bathroom storage is always an organizing challenge. If you love small space solutions and creative storage ideas as much as I do, you’re going to adore this thrifty repurposing project from Frances at Improvement List:

We recently moved into a new house. It has 1920′s charm and a great location, but it is lacking in extra space. To make this house work, I need to keep it organized.
 
The first project I had to tackle was the storage in our bathroom. In the mad dash to unpack, at first, I just shoved everything that belonged in the bathroom into the cabinet under the sink. As a result, I had to spend time every day trying to find what I needed.

Before:

Bathroom Storage Before

(I tried to take a good “before” picture, but things kept falling out.)

The first step was going through everything in the cabinet and throwing out what I didn’t need.

This was not easy for me, but I made myself toss whatever I had not touched in 6 months. It was surprising how much stuff fell into this category!  

Then it was time to organize what was left. Since I didn’t have much width in the cabinet under the sink, I needed to take advantage of the vertical space available. It was off to shop. I looked and looked for shelving that would fit in the space inside the cabinet, but I couldn’t find anything that was just right. Everything was either too big, too wide, or too tall — I felt a little like Goldilocks!

Then, it dawned on me that I could re-purpose shower caddies as shelves:

Use a shower caddy with a flat bottom as narrow shelving in small cabinets

Aquatico Flat Base 2-Tier Shower Caddy

TIP: Make sure you purchase a caddy with a flat bottom so that it can stand on its own in your cabinet.

The shower caddies were just the right size. After purchasing two of them, I put them on either side of the cabinet. I now had a total of four shelves to arrange all of the bottles and other small items I needed to store in the bathroom: one side for my things and the other for my husband’s items.

Use a shower caddy as storage shelving under a small sink I still needed to fit larger items like a hairdryer, but those pesky pipes made it tricky.

Solution: I was able to fit a basket in the open space under the pipes and fill it with the larger items.

Use shower caddies as shelves to organize awkward sink spaces. Genius! I love how well the project turned out. Now I can easily and quickly find everything I need. It was a great improvement to my bathroom!

What I Love:

  • No Installation: excellent for those of us who may be renting, living in a dorm, or lacking the skills required to install custom shelving
  • Space-Savvy: Utilizes all available storage space while working around the awkward pipes
  • Creative Re-purpose: shower caddies are great little storage shelves, and are much more affordable than specialty under-sink shelving options!

What an easy, smart solution that fits juuuuuust right! ;) Thank you so much for sharing, Frances! Check out more of her creative projects on her blog, Improvement List.

Tagged with: , , , , , , ,
Posted in Organizing

Reader Feature: A Pretty Organized Pantry

pretty labels & containers for organizing your pantry

When Kim from O is for Organize showed me her beautifully organized pantry, I just couldn’t “contain” myself!

O is for Organize blog

 Let’s take a second to “ooh” and “ahh” over this pretty pantry door:

Pretty Pantry Storage Containers & Labels The adorable little food storage jars are from World Market (here are some similar containers):

pretty food storage jar from World Market To keep things organized and add a bit of whimsy, Kim used these free labels printed on card stock:

free pretty printable labels that you can customize to organize your kitchen

Pretty Smart: She also cut foam core & placed it on her wire shelves to keep everything from sliding around when the door opened & closed. Brilliant!

wire shelf storage idea Inside the pantry, she used baskets, clear storage containers from Martha Stewart and Flip-Tite, and lazy susan carousels to keep everything corralled:

Kitchen Pantry Makeover I am in LOVE with all of these smart, gorgeous storage ideas! Head over to Kim’s blog to leave her some love & check out the rest of her beautifully organized kitchen.

Who else is ready to drop everything and make pretty labels??

Tagged with: , , , , , ,
Posted in Organizing

3 DIY Methods for Adding Color To Any Room

You don’t have to repaint a room to get a pop of color – try these do-it-yourself methods to brighten any room!

Put some thought into what you want your color scheme to be before starting any projects. If you have an all-white room, you have a lot of freedom when it comes to choosing colors. If your room has color as it is, get some paint samples to get an idea of what will and won’t work.

Dip dye your curtains

Have you ever noticed that runway styles transfer into decor trends? Ombre is a great example of this. Dip-dying your window treatments creates an interesting atmosphere in terms of lighting, and using calming colors like green or blue will give your room a beachy feel.

In order to get the ombre look, first buy a discount window treatment in a light color (white is suggested). Sheer shades in particular work with this project. You’ll also need liquid dye in the color of your choice, bleach, a white bathtub and a washing machine – preferably one you don’t have to pay for, because you’ll need to run it without anything inside to get rid of any leftover dye!

Put your curtains through the wash using as much dye as the packaging suggests. Once they’re washed, make sure they’re very damp – you may need to re-wet them. Fill your tub with water and add some bleach. Lower the side of the curtain that you want to be lighter (usually the top) into the tub and secure it, either by draping the rest of the curtain over the rim or by hanging it from the shower curtain. You can also use a plastic bin if you’re worried about dying your bathtub. Let it soak until the submerged end is significantly lighter. Let it dry, making sure the bleached part does not touch the dyed section, and they’re ready for use!

Paint vases

Vases make great accent pieces in any room because they’re inexpensive, easy to change and can be made into a color blocked piece with bright flowers. You can make them match your window treatment by buying paint the same color as the dye. You’ll need a vase, acrylic paint, white spray paint, a bowl big enough for the vase to fit in and a large plastic bag.

First spray paint your vases. You’ll most likely want to do this outside or in a basement or garage. If you want, you don’t have to use white as a base, but it would complement your ombre curtains. Let them dry before stretching the plastic bag over the bowl. Put a moderate amount of paint into the bag, being careful not to get any on the bowl. Dip the base of the vase into the paint, and set them upside down to dry. You can use painter’s tape to ensure that the paint only goes on the area of the vase that you want it to.

Redo your wooden furniture

It’s not a bad idea to use all three of these projects in one room! Making them the same color, or keeping them in a certain color scheme, will give your room a pop of color while keeping it uniform. Snag a beat-up (but still functional!) piece of wooden furniture at a craft fair. Remove the drawers and cover any handles, glass or knobs with painter’s tape. Cover the piece with white spray paint for a base, let it dry and paint the piece in the color of your choosing. Don’t feel that you need to paint the whole piece – experiment with just painting the legs or the top for a color blocked look!

**This Is A Sponsored Post** Gotta keep the lights on! :)

Posted in Organizing

Staying Productive When You’re Feeling Less Than Motivated

productivity tips: how to stay productive when you're feeling blah

productivity tips: how to stay productive when you're feeling blah

If you’re anything like me, there are some days when you feel energetic & on top of the world, and there are some days when you just want to eat cereal and watch tv.

 via

Here are some tips to keep yourself on track & be a little more productive on your less-than-superhuman days:

1. Turn on the lights.

If you’re near a window and the sun is shining, open it up & let it stream in! Light helps your body wake up, so  turn on all of the lights that you can, and if you want, put on some energizing music, too. I love finding new mixes on 8tracks.

2. Use that timer!

I cannot tell you how many times I’ve been able to convince myself to work on a dreaded task by promising that I can stop after five or ten minutes. Most of the time, I’m either finished or have made some serious progress by that point.

3. Make it interesting

Okay, this one is a little bit silly, but it really works for me. If I have something that I really dread (filing a pile of papers, sorting through emails, etc.), I’ll try to turn it into a game. I’ll set a goal, like, “process 50 emails,” and then record all of the tally marks like I’m earning a point for every item I file or delete. I have found that I really love seeing all of those little tally marks add up, and I’ll usually end up filing a few extra papers just so that I can get more “points.” If you can find a way to make it more of a game, it really makes a difference! (I also try to race my timer sometimes!)

4.Get up & get out!

If you can grab a breath of fresh air, go take a five minute walk. Otherwise, get your blood flowing with some “productive procrastination,” i.e.,  taking care of some mindless physical chore (wipe down your desk, fold some laundry, etc.)

5. Pick the easy win.

Basically, instead of wasting an hour watching tv or surfing the web, do a task that you can complete easily. Sometimes, all you need is that first win to start checking off the rest of your to-do list!


Bonus Tip:

Getting into a good daily routine can really help you put your productivity on autopilot. The less you have to think before completing a task, the more likely you’ll be to actually get it done!


How do you get things done when you’re feeling less-than-motivated?

Related Posts Plugin for WordPress, Blogger...
Tagged with: , , , ,
Posted in Organizing
Subscribe!

Enter your email address:

Delivered by FeedBurner

Get Social!
Pretty Organized Twitter Pretty Organized on Instagram Pretty Organized Pinterest Pretty Organized Facebook Pretty Organized Bloglovin Pretty Organized RSS Feed
Getting Organized Magazine - Small Banner Ad
Shop Pretty Organized Product Picks!


This list contains affiliate links & may result in a nominal commission. I only recommend products that I truly love, but please be sure to read the reviews & decide what works best for YOU! :)

My Zazzle Shop
What I’m Pinning
  • Follow along with this step by step tutorial on how to winter sow your seeds using milk jugs as mini-greenhouses!
Follow Me on Pinterest
Legal Info

Disclosure of Material Connection: I received one or more of the products or services mentioned in some of my posts for free in the hope that I would mention it on my blog. Regardless, I only recommend products or services I use personally and believe my readers will enjoy in connection with my blog theme. I am disclosing this in accordance with the Federal Trade Commission’s 16 CFR, Part 255:
“Guides Concerning the Use of Endorsements and Testimonials in Advertising.”

Pretty Organized is a participant in the Amazon Services LLC Associates Program, an affiliate advertising program designed to provide a means for sites to earn advertising fees by advertising and linking to Amazon.com.